This is the second post in my Fondusi’s Development Blog. You can find the first here.
So, assuming you’ve read up on the first post, it’s time for the first (back-logged) Fondusi’s Development Blog weekly post.
Week 1 – August 1st – 7th
Note: We decided to start out making the map editor so we could get the tile engine up and running quickly before we needed the server, client or networking code. So, until further notice, all posts relate to developing the map editor.
This week I set up the solution’s main projects and began work on the tile engine. I based the map layout on the old game’s map objects and added new capabilities as I saw fit. The major new addition was using map layers. Basically, this is like having two maps stacked on each other. There are special tiles that allow the character to switch between layers. This means we can do things like allow players to walk over other players on bridges or have a house with two floors on the same map.
Tile Layout
The way I laid out the maps is like this:
|
1 2 3 4 |
Map |->MapCell[maptilewidth,maptileheight] |->MapCellLayer[2] |->Tiles[5] |
The MapCell 2-dimensional array is the width and height of the map (in tiles). It holds all the MapCellLayers, which are what I described above. There are currently only two layers, but each layer has an array of Tiles. Tiles actually hold a reference to what tile to draw and what tileset it’s on. The first three indexes in the tile array get drawn below the player and the last two tiles in the array get drawn above the player. So each layer has the ability to draw tiles above and below the player. This will allow for some pretty cool maps.
Update – 2011-09-24
Someone asked a question about rendering tiles on gamedev.
Each map has a two-dimensional array of MapCell objects. A MapCell can be thought of as a “tile slot” in that it represents an area on the map where a tile would be drawn.
Now, each MapCell has two (it could be more, but I only use two) MapCellLayer objects. The first MapCellLayer object is always defined, but the second one is optional (i.e. often == null).
A MapCellLayer can have up to five Tile objects. Tile objects represent the actual tiles being drawn to the screen and hold a reference to the tile index from the tilesheet. The reason there are five Tile objects is because of how they’re drawn and used. They’re set up like this:
- Ground – This is the base tile, it’s drawn on the screen first and appears below all other tiles in the MapCell and the players.
- Mask 1 – This tile is drawn second (if it exists) and provides a way to add tiles with alpha transparency over top of the ground tile. It’s drawn below the player.
- Mask 2 – This is exactly the same as the Mask 1 tile except it’s drawn after to allow for even more control of the map by overlaying more tiles.
- Fringe 1 – This tile is drawn after Mask 2 and is effectively the same as Mask 1 with the only exception being that it is drawn OVER the player. Players get drawn between Mask 2 and Fringe 1.
- Fringe 2 – You may have guessed it already, but this is the same as Fringe 1, but drawn over it.
My draw call works like this:
|
1 2 3 4 5 6 7 8 9 10 11 12 |
Loop through all the MapCells within the camera's view. Loop through all MapCellLayers for the current MapCell If the layer exists Draw the Ground tile if it exists Draw the Mask 1 tile if it exists Draw the Mask 2 tile if it exists Draw the Player on the tile if any Draw the Fringe 1 tile if it exists Draw the Fringe 2 tile if it exists End if layer exists End MapCellLayer loop End MapCell loop |
A few notes:
- If you you build your maps with this system, you can create some advanced looking terrain features with the right tileset. See my example pictures below.
- The point of the MapCellLayer is so that I can have areas where two players occupy the same cell but one is above another one such as on bridges or inside houses (i.e. first and second floor, although inside houses I only draw the MapCellLayer that the player is on).
- I don’t actually draw the players in the tile loop, I just wanted to make it simple. I actually make use of SpriteSortMode.FrontToBack so that each layer has it’s own values and gets drawn in the correct order. The player/npc loop is then done separately. I recommend this method especially if your players/npcs are larger than a single tile.
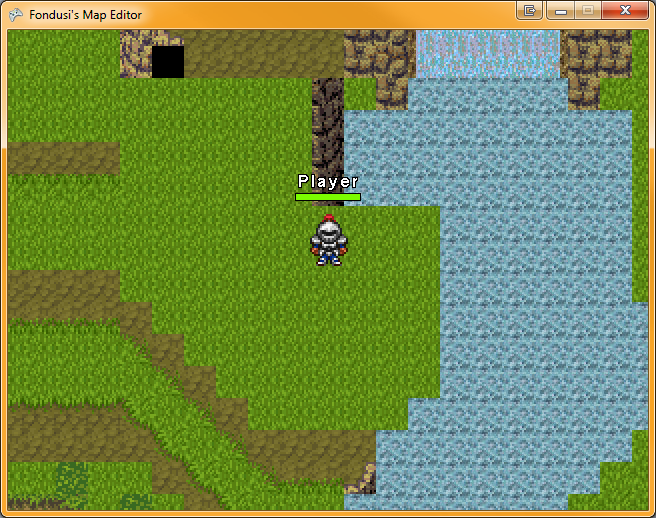
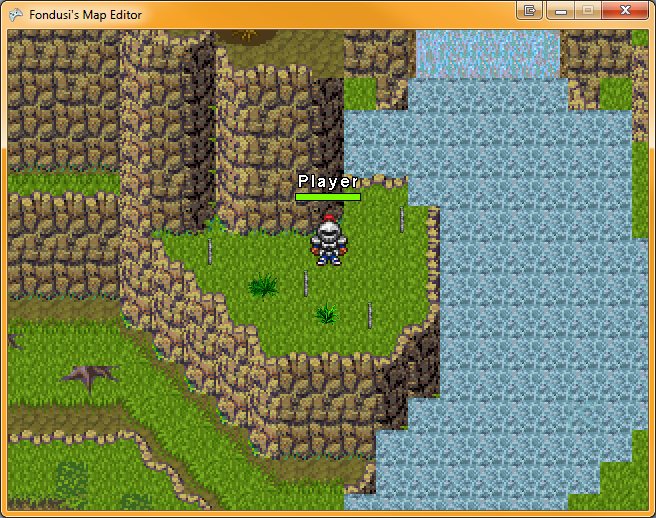
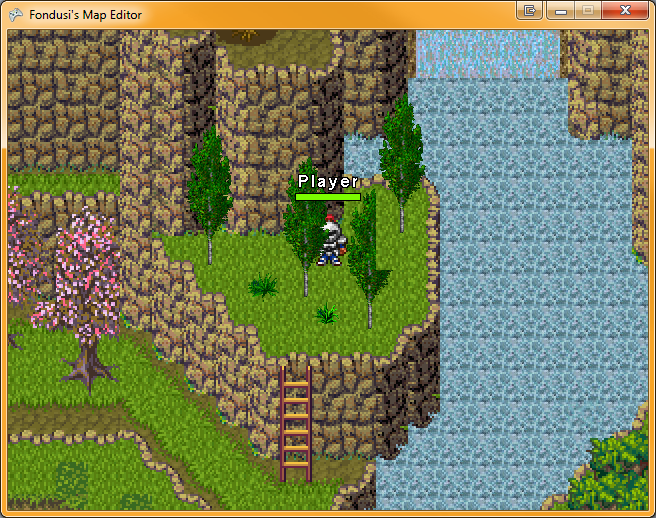
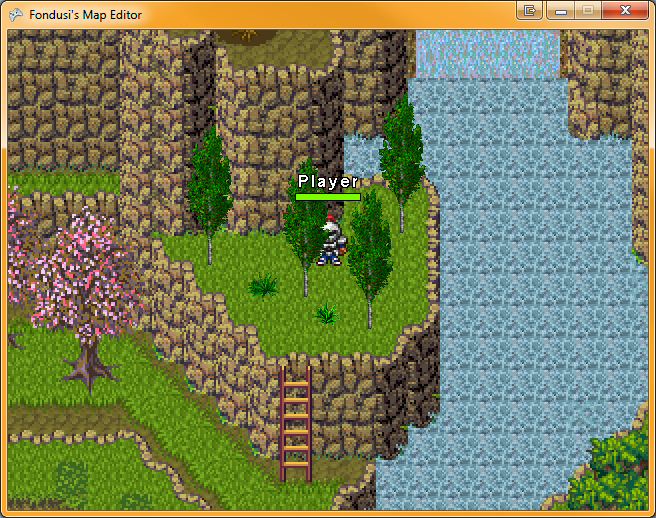
Here’s some example pictures from one of the maps in my game. I’ve taken screenshots working up from drawing only Ground tiles to all tiles up to Fringe 2. The player is stationary.
Ground
+ Mask 1
Note the use of transparency on the bushes and tree roots.
+ Mask 2
Note the ladder being drawn over the rock wall from Mask 1.

+ Fringe 1
Note that the player is being drawn behind the tree.
+ Fringe 2
Note how the branches of the pink tree on the right now overlap the ones from the tree on the left.
/Update
The Rest
Overall, we got the tile engine up and running this week. We added a controls windows form that runs beside the game window. It contains all the controls and information used for editing the map.
The other things that were implemented this week were:
- Added tilesets to controls form
- Added loading/saving of binary and XML (no saving XML) map files
- Added animated tiles
- Added drawing multiple tiles on map from selection on controls form
- Added ability to change resolution from the command line
- Added sprite graphics for players
- Added character class for drawing players/NPCs
- Added directional blocks. This wasn’t in the old game.
I’m going to try to focus on a detail of something I worked on during the week in each post (this one was the map object’s layout). My hope is that this will help other people working on similar things. If you’d like me to go into more detail about something, drop a comment.
So that’s about it for now. See you next time!


Uhhm..Hello there, A lot of other folks will be benefit from your writing. Cheers!